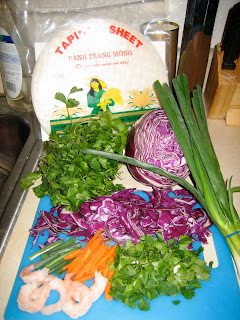
These spring rolls are quick easy and delicious! The ingredients can be easily substituted for what you have on hand (almost anything tastes good in a roll and dipped in sauce). I tried my first fresh spring roll at
Good Karma Vegan Cafe in Downtown San Jose five years ago and fell in love with the crunchy veggies in a strange chewy wrapper that didn't look like something I was supposed to eat. I was determined to figure out how to make them. Turns out it was a Tapioca Sheet (or Rice Sheet) that can be found at any asian market. Since then I've been switching up the veggies inside using tofu, roasted bell pepper, cucumber, shrimp, temph, mushrooms, crab, rice, glass noodles, and what ever else was in the fridge.

This is my favorite combination of ingredients, the textures and flavors really work together, not to mention the colors look great!
Fresh Spring Rolls
What you will need:
Tapioca Sheets
Purple Cabbage - sliced thin
Carrots - shredded or sliced thin
Scallion - sliced lengthwise and then by the inch
Shrimp - cooked and tails removed
Cilantro - roughly chopped or torn
The Tapioca Sheets are hard and translucent but will soften when put in water. Take a single sheet and hold it under the tap for a few seconds on each side so that the whole surface has been moistened (or if you have icky tap water dip them in a bowl of water). Shake the sheet a little to get off extra water. Lay the sheet on a plate with a little bit of the sheet hanging over the edge nearest you so it is easier to grab later. At this point the sheet will still be firm but will soften as you build the roll. Be sure to only wet one sheet at a time, they don't need to presoak so just wet more as you go.

Start layering the ingredients in the center of the sheet and about an inch in from each side. The sheet should be soft and sticky now.

Gently lift the side of the sheet nearest you and fold over filling, pushing the filling towards you slightly so the roll is snug.
Using both hands fold in the sides, and roll up the rest of the sheet keeping it as tight as possible.


Now you can set the roll aside and start your next one. If you are making quite a few or if it will be a while before you eat them, cover them with a damp paper towel. To serve I like to cut them in half, this makes them look really colorful and also handles easier as finger food.
Now for the Peanut Sauce! Although this sauce is featured here with spring rolls, I use it on almost everything. This is my favorite sauce and I usually mix up a big batch and keep it in the fridge so I can have it on hand. It takes longer than most dipping sauces to put together but it is definitely worth it! I use it as a dip, salad dressing, over fried rice and noodles, over vegetables, temph, tofu, and usually end up eating it with my fingers when the food is all gone!

Peanut Sauce
What you will need:
1/4 cup Peanut Butter, creamy or chunky
1 Tbs Rice Vinegar
1 Tbs Brown Sugar
1 Tbs Soy Sauce
1 tsp Chili Garlic Sauce or Sriracha (medium heat)
1 tsp Ginger, minced
1/2 tsp Sesame Oil or Peanut Oil
1/2 tsp Lime or Lemon Juice
1/2 tsp Garlic, minced
1/2 tsp Lemon Grass, minced
This makes roughly 1/2 a cup of sauce. If you want to have leftovers then I recommend doubling the recipe. It stores well in the fridge for a week or two if you can manage to not eat it all right away. Always taste and adjust to your liking. If you have made the sauce too spicy, add more Sesame Oil. Also, Lemon Grass can be hard to find so don't let it prevent you from making this, just leave it out.


