Monday, October 10, 2011

Chocolate Zucchini Bread and Muffins


This is a delicious and healthy way to enjoy the end of zucchini season. Now that Autumn is in full swing and we are getting some cold and rainy days, there is tendency for people to want to spend a day cozied up with a good book and fluffy slippers. Don't lie, you know as well as I do that this cozy day usually involves indulging in some favorite warm food with more calories that you'd care to count. This Chocolate Zucchini Bread is a perfect solution! You get the yumminess of the warm chocolaty carbs that is secretly packed with low calorie zucchini and apple sauce! There is so much flexibility in this recipe, you can make bread or muffins or both, you can make it chocolaty or plain, healthy or traditional.

What you will need:
2 1/2 cups Zucchini
3/4 cup Unsweetened Apple Sauce
1/3 cup Canola Oil
3 Eggs
2 tsp Vanilla Extract
1/2 cup Brown Sugar
1/3 cup Honey
3 cups Flour
1/2 cup Unsweetened Cocoa Powder
3 Tbs Ground Flax Seed
2 tsp  Cinnamon
1/4 tsp Nutmeg
1/4 tsp Allspice
1/4 tsp Ginger
1 tsp Salt
1 tsp Baking Soda
1/4 tsp Baking Powder
1/4 cup Raisins
1/4 cup Chopped Almonds

First lets get the zucchini grated so it is ready to go. Be sure to leave the skin on because it is full of nutrients such as potassium, folates, fiber, as well as vitamins A B and C. Use the large side of  a cheese grater to grate roughly 2 1/2 cups and set aside.
In a large bowl combine the apple sauce, canola oil, eggs, vanilla extract, brown sugar and honey and stir together with a spoon. Then stir in the grated zucchini.
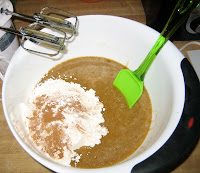
In a separate bowl combine the flour, cocoa powder, ground flax seed (you can grind the flax seeds in a coffee grinder or use flax meal), cinnamon, nutmeg, allspice, ginger, salt, baking soda, and baking powder. Once these are combined you can slowly stir it in to the wet mixture. Then stir in the raisins and almonds (walnuts or pecans would be good too).
Set your oven to 350 and grease your bread pan and/or muffin tins. This will make roughly 2 bread loaves or 24 muffins. The muffins will need to bake for about 20 minutes and the loaves will need 50-60 minutes or until a toothpick comes  out clean. Let them cool for 10 minutes before placing on a cooling rack.
Enjoy this scrumptious and healthy treat!

Sunday, August 28, 2011

Oeufs en Cocotte

So I just finished reading Julie and Julia. One of the recipes that Julie really likes making from Julia Child's The Art of French Cooking is Oeufs en Cocotte (Eggs in Casserole). Although this is not a traditional version, it will not kill you as quickly as Julia Child's heavy butter cream and bacon versions.

The day before yesterday my mom asked me what to do with Swiss Chard. I realized I couldn't come up with anything better than salad greens, steam or saute. I knew I could do better than that.
This is a twist on an old French classic.

What you will need:
(This makes 2 servings for 10 oz ramekins)
9 small Tomatoes
1 cup Onion chopped
1 1/2 cup Swiss Chard chopped
2 cloves Garlic
Fresh Thyme
Fresh Oregano
Fresh Basil
1/2 cup Jalapeno Havarti Cheese chopped
1 Tbs Sour Cream
2 Eggs separated
Olive Oil
Balsamic
Salt
Pepper

I guess Daisy wants to help :)

To get started heat your oven to 350. Spread the tomatoes out on a cookie sheet that is lined with foil. Place them in the oven for 20 minutes or until they have shriveled. Once they are done you can set them aside to cool but leave the oven set to 350. You will use 4 tomatoes for each dish and be sure to have an extra for you to eat on it's own, they are so yummy!
While the tomatoes are baking, chop up 1 cup of onion and put it in a frying pan with about a tablespoon of olive oil and a splash of balsamic and turn to medium low heat. Let the onion cook down until translucent, about 7 minutes.
Wash the chard and dry with a cloth. Trim off the stems and then chop into roughly 1 inch pieces.You should have about 1 1/2 cups of tightly pressed chard. When the onions are cooked down add the chard and let it wilt for about 2 minutes stirring frequently.
Dice the 2 cloves of garlic and a small handful of fresh thyme, oregano and basil. Add these to the chard and onion for an additional minute. Then remove from heat and scoop it all into a bowl so it can cool.
Shred or chop 1/2 cup of cheese. I used Jalapeno Havarti because I had it on hand, but you can use what ever kind of cheese you like, I think Gruyere is the traditional cheese for this dish. Once the chard and onion is cooled, add the cheese to the mix.
Add 1 tablespoon of sour cream if you have it, but you could also use cream or half-and-half or omit all together.
Now we need to separate the eggs. Let the egg whites drop into the chard mix and carefully place the yolks in a small bowl making sure the yolks don't break. Mix the whites into the chard and add a bit of salt and pepper.
Place a little pat of butter in the bottom of each of the ramekins and put them in the oven until the  butter melts.
Put one tomato on the bottom of each dish, then divide the chard mix evenly between the dishes. Top with 3 tomatoes on each. Very carefully place a yolk on top of each dish and finish it off with a little more pepper. Put them in the oven for 10-20 depending on how you like your eggs.
When you take them out of the oven let them cool for a minute and then top it off  with fresh thyme and basil.
This would go nicely with some fresh baguette too!

I think this is traditionally a breakfast dish, but it would also make a nice light lunch or the main course of a dinner. Thank you Julia Child and Julie Powell for the inspiration, as cliche as that is. And thanks mom for provoking me to think outside the box with Swiss Chard. Does anyone have any creative ways to make Swiss Chard?
Bon Appetit!

Monday, August 15, 2011

A Place to Call Home (I know this is not really an edible post, but you can eat the Nasturtiums)

I have been talking with many of you about my recent move from San Jose to Half Moon Bay and I thought I should share our new place with all of you lovely people. Although San Jose is nice and SUNNY and wonderful in many ways, most importantly the awesome people who live there, I am really enjoying living on the coast as  well. It is really comforting to be back in a place with trees and dirt and creeks and all of those good earthy things. I have started to really enjoy gardening and have quickly filled up our little patio with potted plants of this and that. We live in a little studio apartment/ in-law unit/ cottage above Jesse's parents' garage. It is rather small, but it is fun because it kind of feels like we live in a fort, you know? where you arrange the couch cushions and pillows on the floor so one "room" is the kitchen and one is the bedroom? It's kind of like that. Well, I guess I'll let you see for yourself. 

This little kitty in the picture above is Oliver. He showed up at their house around the same time we moved in and so we've bonded. He acts like a dog and has a huge ego.
Here is a view of our little place seen from the front of the garage. See the little window flower box? I was so excited about that! Kind of a pain to water though. Then around to the back to the stairs leading up to our door and our little patio.


That's Wally checking out what's going on. I had a lot of fun with the flowers on the steps.


Jesse's old work boots re-purposed as fantasticly funky flower pots. Also a tea pot, shells, a dog shaped basket, and an old purse with a busted strap.


       These are my new seedlings (below), courtesy of Erin, I'm pretty sure these are going to grow into radishes but only time will tell. There is another tub around here somewhere with smaller seedlings that are just popping up that will turn into mint, or basil, or mustard greens, or strawberries ( I couldn't remember which seeds where which).


Here are the wonderful Nasturtiums, they grow like weeds, are gorgeous to look at, and taste great on salad. Yes they are growing in a very tiny falling apart barbecue. I just couldn't let it get trashed, I liked the burnt red  paint too much. I'm hoping the vines will keep snaking up the grill until it is a enormous monster nasturtium plant! I'm trying to tempt it.


I'm in love with this wood crate. It is a dairy delivery crate from 1947. Since I do not really have a need to deliver dairy, I decided to fill it with snapdragons, succulents, nasturtiums, and strawberries. 
Look at these curious cuties! Stella, Wally, and Oliver, a wonderful welcome home party.


Here's a view of the studio from up on the hill, and now we are going to go inside.
Let's just call it an "open floor plan".


So here is the "bedroom". This quilt was made by my Nana with love. On the right is an old painting of mine. It is smaller than most of my pieces and was able to fit in this little wedge of wall. Check out that ceiling, never thought I'd hit my head on the ceiling reading in bed. The height of this "wall" measures about three feet, thank god we are short.


This is looking out towards the driveway. I decided to make curtains for all of the windows, I figured be pretty straight forward for a girl that doesn't sew. It was kind of fun actually. 
Oh and the spider plant on the right was a gift from the lovely Mary at by BFA show.

Although the studio is compact, the kitchen is actually very spacious. 


The curtains in the kitchen have little owls on them. Jesse made the little magnetic bottle cap board. And the photo in the frame is by the talented Tim Walker www.timwalkermedia.com
Oliver investigating.


One upside to having an Easy-Bake-Oven sized oven, it heats up really fast!
Between the kitchen and the bathroom is our multipurpose bookshelf / tea and dish shelf and a home for all of my monster art books.


In front of the bookshelf is the dining area and back in the wedge of the wall and ceiling is my little desk area and another bookshelf. Then in front of my desk is our little living room.


Just off the living room is our bathroom. More homemade curtains. Not much else to say, it's a bathroom.


On the other end of the living room is Jesse's  desk area. Jesse made the little popsicle house that you can see on the right when he was in second grade.  And Wally is patiently waiting to go back outside.

So now you've seen our little home, so friends, give me a call and come visit us!

Wednesday, July 27, 2011

Carrot Cake

This cake is so delicious!!! This is the cake my mom asked me to make her for her last two birthdays, and in the spirit of the big day, July 26th, it was time to make the good ol' Carrot Cake.
So, Happy Birthday Mom!
A carrot cake might make you think "healthy cake"  due to all the vegetable, but I promise there is nothing healthy or diet about this cake. Just surrender to temptation, it will be worth it. It is dense and moist, sweet and a little spicy.

This recipe makes a really big cake so try not to cry at the amount of oil, sugar, cream cheese and what not. Just have a party so you can share it!

What you will need:
Cake Batter
1 1/4 cup Canola Oil
4 Eggs
1 cup White Sugar
1 cup Brown Sugar
3 tsp Vanilla Extract
2 cups Flour
2 tsp Baking Soda
2 tsp Baking Powder
1/2 tsp Salt
3 tsp Cinnamon
1 tsp Pumpkin Pie Spice
3 cups Grated Carrots
1 cup Chopped Walnuts

Frosting
1/2 cup Butter, softened
8 ounces Cream Cheese, softened
1 tsp Vanilla Extract
3 cups Powdered Sugar
3/4 cup Chopped Walnuts

Preheat your oven to 350 and grease a 9x13 baking dish.
Let's start by grating the carrots, the picture above is a gross overstatement of the number of carrots you will need, it will be closer to 4. Wash the carrots and peel them if you like, I chose to skip the peeling. Be sure to use the side of your grater with the largest holes, if you use the smaller holes you end up with carrot mush and that will lead to Carrot Mush Cake. Grate 3 cups worth of carrot and set aside.

In a large mixing bowl combine the 1 1/4 of Canola Oil, 4 Eggs, 1 cup White Sugar, 1 cup Brown Sugar, and 3 tsp Vanilla Extract. I substituted in 1/4 cup of Grapeseed Oil which is why mine looks green, but it is not necessary, I just like it and have it on hand. Use beaters until smooth.


Now add 2 cups Flour, 2 tsp Baking Soda, 2 tsp Baking Powder, 1/2 tsp Salt, 3 tsp Cinnamon, 1 tsp Pumpkin Pie Spice (or Nutmeg). Beat ingredients together until smooth.

Now add the 3 cups of Grated Carrots. Use a spoon or a spatula to mix the carrots into the batter.
Next stir in 1 cup of Chopped Walnuts.


Pour the batter into the greased 9x13 baking dish and spread it out evenly. I know the cake looks kind of disgusting at this step, so try to keep in mind that it will look and taste a lot better after it is cooked :)                            
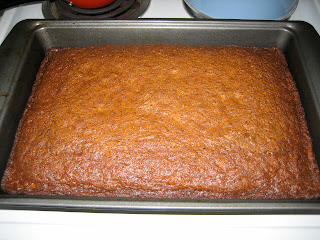
Bake for 40 to 50 minutes. Mine was ready at 48 minutes. At 40 minutes you can check the cake by pulling it out and giving it a little wiggle. If the cake is jiggly in the middle then it needs more time to set up. Don't walk away and forget about it though! At this stage a few minutes can make a big different. Carrot Cakes should be nice and moist so be careful not to over cook it.


Now doesn't that look better??
Let the cake cool completely before frosting. . .this is important, if you frost it too soon your cake will be strangely soggy from all of the steam trapped under the frosting. I chose to only frost the top of the cake since I wanted to keep it in the baking dish. If you would like to frost all of the sides as well, let the cake cool for at least 10 minutes before flipping it onto a large cooling rack.


On to the frosting!
In a medium sized bowl slightly soften 1 stick of Butter and 8 ounces of Cream Cheese. Add 1 tsp of  Vanilla (optionally add 1 tsp of Cinnamon). Beat together until smooth. Slowly beat in 3 cups of Powdered Sugar until all is combined. Stir in 3/4 cup Chopped Walnuts.
Spread the frosting over the cake evenly.
Keep the cake covered and refrigerated. To keep the cover from sticking to all of the frosting, you can make a little tent using toothpicks or coffee stir sticks around the edges of the cake and cover it in tin foil.

Enjoy!!!

Tuesday, May 31, 2011

Wild Child Summer Salad


I'm not really sure how to categorize this salad. Extravagant coleslaw? Caribbean? Whatever it is, it is delicious and a real looker! And it's really good for you too! This gorgeous salad will outshine any dish you try and serve with it, so you might as well let it be the star!

Warning: If you think nutrition is boring, skip the next paragraph because here it comes!

Eating by the rainbow ensures you are getting the full range of antioxidants and vitamins from your foods and also pushes you outside of your comfort zone to try new foods. Variety is the key to healthy eating. Here are the ingredients and health benefits by color:

Cranberries, Radishes vitamin C, lycopene, anthocyanins
Carrot, Apple Cider Vinegar alpha-carotene
Mango, Cumin beta-carotene, alpha-carotene, vitamin A
Cucumber, Cilantro, Magdalena Pepper, Avocado, Pistachios vitamin C, vitamin K, vitamin A, capsaicin, lutein flavonols, fiber, potassium, vitamin E, folic-acid
Purple Cabbage, Shallots, Purple Garlic vitamin K, vitamin C, Manganese, Potassium, vitamin B6, diallyl sulfides, anthocyanins
(The cloud right?) Feta Cheese, Coleslaw Dressing Calcium
Flax Seed (definitely the pot of gold at the end of the rainbow) Iron, Fiber, Protein

Let's get started with the dressing. . .
Yes, I use store bought Coleslaw Dressing because I like it, but I give it my own twist. Start by chopping up some purple garlic, about 2 cloves, and scrape it onto a flat piece of tin foil. Add about a tablespoon of flax seeds to the tin foil. Place it on a cookie sheet and place on the top oven rack and put it on broil. Don't walk away from the oven! The flax seeds burn really quickly. Only let them bake for 2 or 3 minutes. Then pull them out and mix them into the dressing. Add 1 or 2 tablespoons of the Apple Cider Vinegar to the dressing as well as salt, pepper, and a good dose of Cumin.

Slice the cabbage into strips, I like mine about 1/2 an inch wide and 2 inches long. The cabbage should make up about 2/3 of the salad's bulk.
Skin the cucumber and then slice.
Slice the radishes, carrots, and scallions.
Mince the magdalena pepper.
Chop the cilantro.
Cube the avocado.
Slice the mango into wedges.
Top with the feta cheese and cranberries.
Crack open the pistachios, and smash them between two paper towels so they are crumbled. Sprinkle over the top of the salad.
Top it all off with the dressing and fresh ground pepper.

You can have a lot of fun with layering this salad since it's so colorful, so play around with the presentation!

Monday, May 9, 2011

Spicy Papaya Fried Rice with Snow Peas


There is something wonderful about eating a papaya on a sunny day that just makes you feel like you are on vacation on a tropical island. Life is always good when you eat papaya.

And so I had no choice but to buy the big beautiful mexican papaya that was waiting for me a Trader Joe's, I just had to have it.

And since the Easter Bunny was still on my brain, I couldn't help but think of bunny ears when I cut open the papaya. Do not try this at home, it resulted in lots of papaya seeds in my hair.


What you will need:

Brown Basmati Rice
Papaya
Snow Peas
Fresh Garlic
Fresh Ginger
Calçot Onion (or Green Onion)
Lemon
Pistachios
Sriracha

I started by cooking up a cup of rice or so in my rice cooker. If you don't have one, you clearly don't know what you are missing.

Once you have the rice going you can move on to the fun stuff.

Fresh ginger is amazing in cooking and not as tricky to use as it may look. Chop off the amount of ginger you would like to use, I used about a finger's width. Use a sharp knife or peeler to remove the skin. Then you can dice the ginger the same way you would dice garlic. Then chop up two or three cloves of garlic.

Wash the snow peas and remove the ends. Toss the ginger, garlic, and snow peas into a frying pan with a little bit of canola oil and about 1/4 cup of water and turn to medium heat.

While this is cooking chop up the onion. Toss the white bulb part of the onion into the frying pan and save the green part to use as a garnish.

Shell the pistachios and wrap them up in a paper towel, place them on your cutting board, and smash them with the bottom of a glass. Set the crushed pistachios aside to use as a garnish.

Cut your papaya in half and scoop out the seeds with a spoon. Mexican papayas are much larger than regular papayas, so I only used a 1/4 of it. If you are using regular papayas you might want 1/4 - 1/2 papaya per person. Slice the papaya into strips and remove the skin.

Once the rice is done add it to the frying pan. Squeeze fresh lemon juice over the rice and add Srirachia to your desired level of spice. In case you haven't noticed, I have developed quite a tolerance to spicy food, making me want everything hotter and hotter. It's almost like I want my food to be so spicy it challenges me. Maybe I'm crazy. If you are not a spice lover, you could add pizzazz by adding soy sauce, rice vinegar, or teriyaki.

Scoop the rice and snow peas onto your dish. Top with the sliced papaya, green onion, crushed pistachios, another dash of Srirachia, and serve with a slice of lemon.