Wednesday, May 15, 2013

Odds and Ends


Hi. SO I haven't posted in over a year, but this morning my brother Adam (who lives in Seattle and doesn't  have facebook) pestered me about not blogging and said he wanted to see more of my little apartment and my stuff. Eventually I gave in and promised to put together a blog of odds and ends around my home.

Life has been marching on along since I last blogged. The biggest update is that I will be starting grad school in the fall at California College of the Arts. Jesse and I are still living in Half Moon Bay and enjoying every day of it.

This is a photo from the waterfalls at Big Basin that Jesse and I went to a few months ago. Gorgeous area and lots of wild orchids.


Puppy cuddle puddle and Stella pretending to be a lap dog.
 
Also, a crab having his last drink before we threw him in the boiling water.

As some of you know, I just can't resist a good garage sale or thrift store and have trouble resisting a strange find. It's all about digging for treasure. These are some of my new additions and a closer look at some of my favorites.
In the kitchen: ceramic tractor ashtray (I think) on the wall, owl dish and ceramic mussel s&p shakers.


Wooden shaving mirror, and my new treasure is this wooden handyman carrying case I found in Ben Lomond, I think it is for nails and screws and things, there is paint splatters on the side. The owl on top is a bottle opener and the monkey in the middle is a tea infuser.


Despite our living space being so compact, we also live with 3 large carboys which Jesse uses for brewing. The carboy on the right is full of hard cider for this summer's festivities. Can't wait!


And of course Oliver is everywhere.                    New little potholder from Senior Coastsider's Thrift Store.


Top of the little shelf that divides the "bedroom" from the kitchen. In the front you can see the new air plant in a shell Jesse got me for my birthday. Also cool new red rocks and other things that seem to collect in this spot.


Oliver is now busy getting cat hair all over my bed and lazily attacking my legs when I walk by.

 I finally got around to painting my garage sale and thrift store chairs. Jesse is not wild about my color choice and thinks our apartment looks like Disneyland but I think they are fun. I am too young to take my living space seriously, actually, maybe I never will.


On the left, a small patinaed sconce. This is the corner wedge of the apartment next to the bed. Homemade yellow curtains, family, painting, ukulele, hat, big stack of art books, life is good.


A view across the width of the apartment from the wedge where the wall and ceiling meet.
Yup, so this is pretty much all of our apartment. On the right is a cool star light Tristan and Kaisa gave us. Paintings, dishes and books, Tom Petty poster.


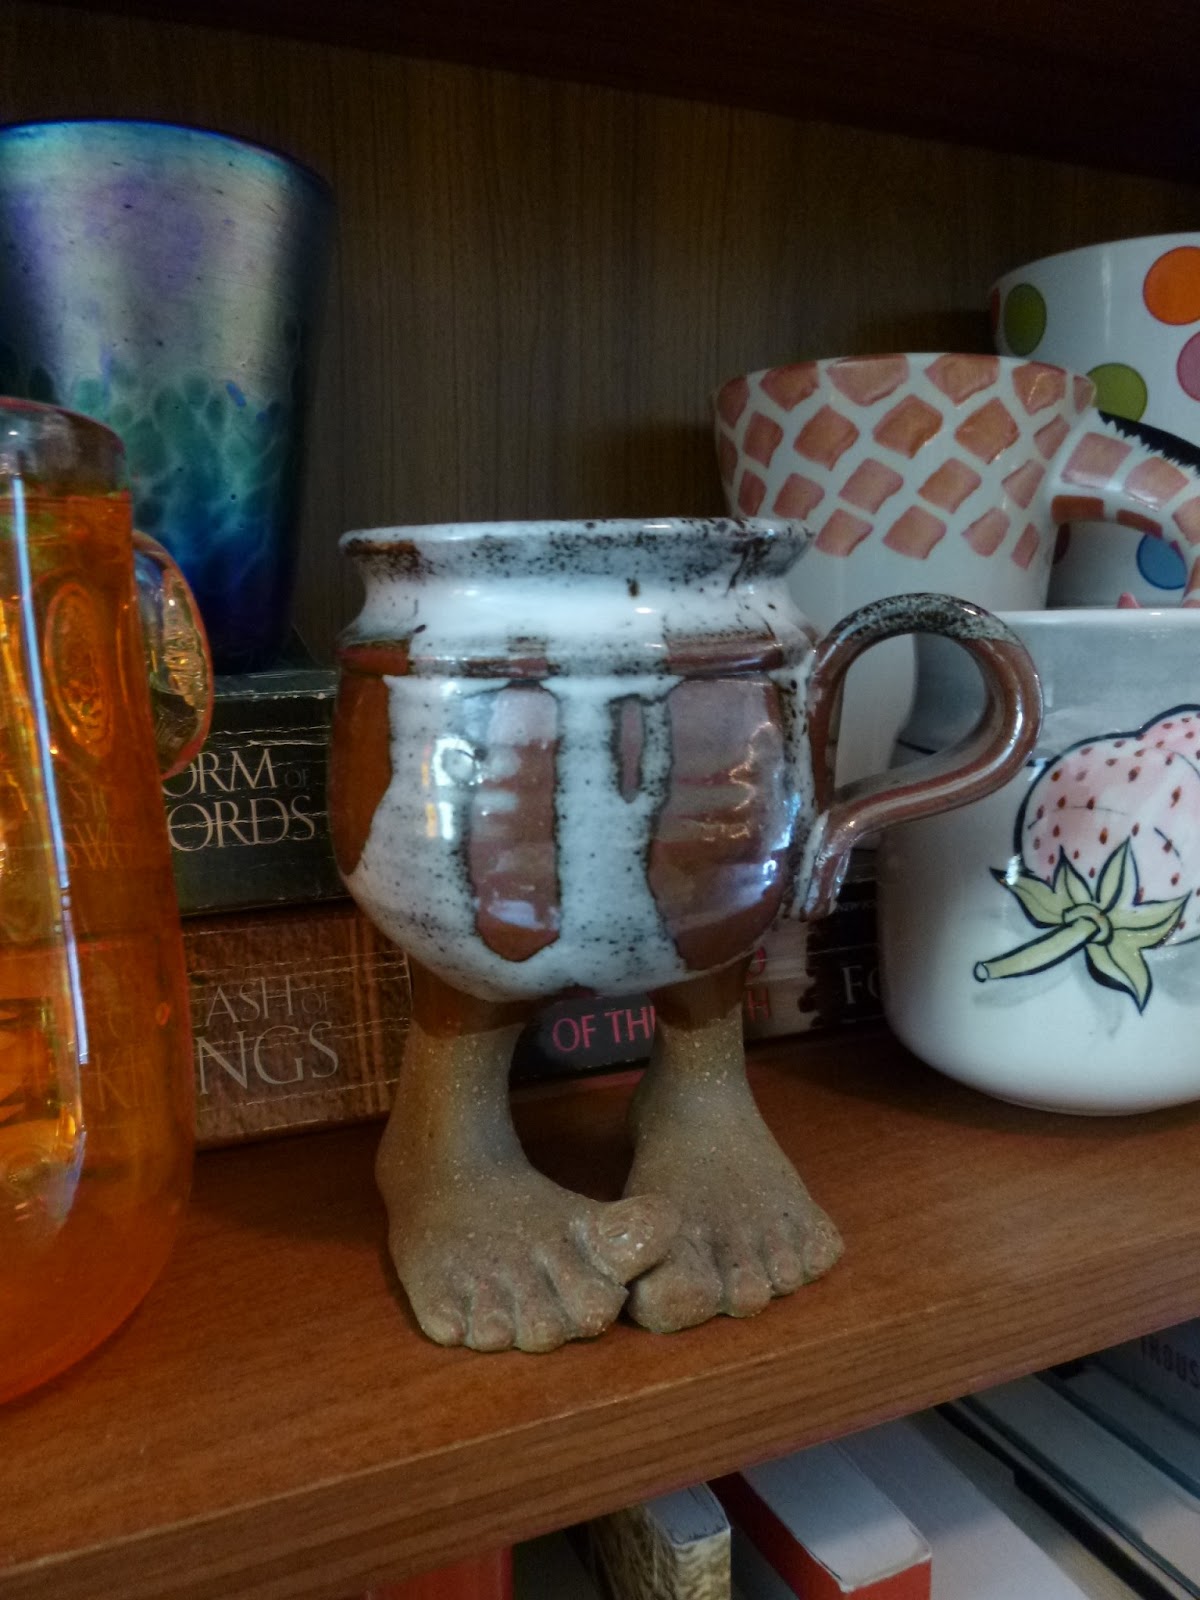
A true treasure, I love this pigeon toed mug from Jerome, Arizona. On the right, Aliyah's banjo that Jesse has been borrowing and the red box is a cigar box amp that Jesse made. 


 A large wooden beaded dream catcher above our bed, also from Arizona.

Jesse's bottle cap magnet board in the kitchen (this is not the entire collection, just the ones that fit).

Now for all of the little plants going on! Here is one of the window boxes.
This is where I do the planting on my little deck.
New plants on the deck and steps. New cute little bonsai tree from Geri on the left, and on the right, what Jesse calls my sunny-side-up flowers.


New trio of succulents hanging on the railing and a new treasure of and old tea kettle on the bottom step. Also, boots with big holes through the bottoms made perfect planters for these little purple pansies.

And that concludes the tour of our little home sweet home.
Adam, I don't know what else you want me to take pictures of.
Signing out, here is Oliver's current location.


Monday, April 16, 2012

Pineapple Curry

This is not a traditional curry, so food purists, be warned. Lately I have been kind of addicted to curries, from the scrumptious tomato based Veggie Masala from the new North Indian restaurant in town ( arkgrill.com ) to the wonderfully fragrant and spicy Panang Curry that I can't help but order again and again when I go out for Thai. Then when I read about an Indonesian Pineapple Curry on Tastespotting.com I couldn't stop thinking about how much I wanted to try it. As a result, my curry saturated mind has combined all three to created a curry-fusion to satisfy my indecisive taste buds.
What you will need:

1 package Firm Tofu
2 Carrots
1 cup Green Beans
1 Red Bell Pepper
1 ½ cups Pineapple
1 Shallot
2 Tbs Fresh Garlic
2 Tbs Fresh Ginger
1 can Coconut Milk
2 Tbs Tomato Paste
2 Tbs Smooth Peanut Butter
2 tsp Garam Masala
Cumin
Cinnamon
Nutmeg
Allspice
Sriracha
Salt
Brown Sugar
Lime
Rice Vinegar
Soy Sauce
Fresh Basil
Oil and Water as needed

Lets get started with the tofu (although I am using tofu in this recipe it would be simple to substitute in any type of meat). Start by draining the tofu. When using the fresh tofu that is packaged in water, it is important to press the tofu to remove the excess water. This allows the tofu to absorb all of the flavor you cook it with. Slice the tofu into even strips. Line a cutting board or cookie sheet with a few paper towels and spread out the tofu. Layer with more paper towels and place another cutting board or cookie sheet on top. Then you want to put something heaving on top to add weight such as plates, coffeemaker or books. Let the tofu sit like this for a half hour or so.

Now for the prep work; the cooking process is a lot easier if everything is ready to go. Rinse the carrots, green beans and bell pepper. Cut green beans into bite sized pieces, peel and slice the carrots into rounds, and set the green beans and carrots aside. Chop the bell pepper into bite sized pieces. Peel and core the pineapple and cut into one inch pieces. The bell pepper and pineapple will cook together so place them in a bowl together. Mince the shallot and the garlic. Peel the ginger and mince. Open the can of Coconut Milk and the Tomato Paste. Have the remaining ingredients at hand to add as you go.
Now it is time to start cooking! Get out your favorite large skillet, frying pan or wok. For this recipe I used the fat of the coconut milk to cook with instead of oil. When you open the coconut milk you will notice that it appears to be solid. Only the top half of its contents should be solid and the bottom half should be the coconut water. You can use the two haves individually to maximize it's cooking potential. Scoop about half of the solid coconut milk into the pan and turn to medium high heat. The coconut milk should liquify and start to form large bubbles. At this point add the shallot, garlic and ginger to the pan. After a few minutes it should be nice and fragrant. Add the half of the liquid part of the coconut milk, the Tomato Paste, Peanut Butter, Garam Masala, Sriracha to your comfortable level of heat, and a dash of the Cumin, Cinnamon, Nutmeg and Allspice. Stir until combined and then mix in the green beans and carrots. Turn to a simmer and let the green beans and carrots cook until al dente, stirring occasionally. If at any point the curry seems too thick you can add more of the coconut milk liquid or a splash of water.
While this is cooking you can finish up the tofu by cutting it into bite sized pieces. Once the green beans and carrots are tender but still firm, scoop all of the curry into a large bowl and set aside. Return the pan to the heat and add another scoop of the solid coconut milk. Once it is bubbling add the tofu to the pan. Scoop a little bit of the curry sauce from the bowl and add it to the tofu to infuse some of the flavor. I also added some extra large pieces of ginger just to add flavor, but they aren't really needed. Allow the tofu to cook a few minutes on each side. If you prefer your tofu crispy you will need to add some oil. Once the tofu is cooked to your liking, scoop the tofu into the bowl with the green beans and carrots and gentle toss so the tofu is coated in the curry sauce. Return the pan to the heat.

Again add a little scoop of the coconut milk solid to the pan and bring to a bubble. Now add the pineapple and bell pepper and cook over medium heat. Add a sprinkle of salt to help release the juices. Once the pineapple and bell pepper are soft, drain the juices into the bowl of curry and return the pineapple and bell pepper to the heat. Create a hole in the center of the pan and add a small splash of oil. Toss the pineapple and bell pepper with the oil and add a sprinkle of brown sugar. Turn to high heat and stir every few minutes so the pineapple and bell pepper get a nice brown sear. Add to the bowl of curry.


Now for the finishing touches. Pour all of the contents of your curry into a large pot and bring back up to heat. Squeeze the juice of one Lime into the curry and stir occasionally. Add a splash of Rice Vinegar and Soy Sauce to taste and get fancy by cutting a chiffonade of Basil to top it all off!


Best enjoyed over rice or with a side of your favorite naan.

Good luck stopping after just one helping!


Wednesday, January 11, 2012

Eggplant Pasta with Black Trumpet Mushrooms and a Simple Kale Salad

This is a delicious hearty dish full of earthy flavors with a little element of surprise. What? No pasta in the pasta? That's right, the eggplant actually is the pasta! Surprise! That means this dish is gluten free yet even more filling that a normal plate of pasta.
The Black Trumpet Mushrooms for this dish were handpicked from this hillsides of beautiful Humboldt on a New Year's Day hike with a group of amazing friends that seem to have a sixth sense for finding wild mushrooms.We found pounds and pounds of Chanterelles, Hedgehogs, Black Trumpets, Candy Caps, and a few enormous Boletes that were past their prime. Although we gorged ourselves on fresh mushrooms while we were there, I took a handful of Black Trumpets home to dry and save for later when I was starting to have withdrawals.

I started by soaking the Black Trumpets in red wine. I used Rabbit Ridge Barrel Curvee Zinfandel because it has rich flavors of blackberry and spice that I thought would work well with the earthy mushrooms.
I started some diced yellow onion caramelizing with a little bit of olive oil in a large frying pan. While this was going I sliced the eggplant into thin ribbons about the size of fettuccine. Next I chopped up some sundried tomatoes and some garlic. Once the onions were starting to brown I added the eggplant noodles, sundried tomatoes, garlic, and Black Trumpets along with the wine they were soaking in. Add another touch of olive oil and toss together over medium heat. Cover the pan for a few minutes to help the eggplant soften up. Stir frequently. When the wine is absorbed and the eggplant is tender, mix in a scoop of soft goat cheese and a dash of salt and pepper. Once the goat cheese is melted in and is coating the pasta you are ready to eat!

Kale salad is a refreshing winter salad I've recently been turned on to. They are often called "Massaged Kale Salads" because the kale will soften if you massage the lemon juice and olive oil into the leaves with your fingers. I stated with a bunch of curly kale, although red curly kale, dinosaur kale, or a mixture of all three is also great. Rip the kale into small bit size pieces. Then drizzle olive oil, lemon juice, and in this case champagne vinegar over the kale and then roll up your sleeves and massage it all together. Once all the leaves are fully coated set it aside. Chop up some red onion and add it to the kale. Toss in some sunflower seeds, nutritional yeast, salt and pepper. If you are wanting to get a little fancier with this kale salad you can also do chopped leeks, grated carrot, pumpkin seeds, pine nuts, diced tangerine, and grated firm goat cheese such as Cypress Grove's Midnight Moon.
Enjoy!

Monday, October 10, 2011

Chocolate Zucchini Bread and Muffins


This is a delicious and healthy way to enjoy the end of zucchini season. Now that Autumn is in full swing and we are getting some cold and rainy days, there is tendency for people to want to spend a day cozied up with a good book and fluffy slippers. Don't lie, you know as well as I do that this cozy day usually involves indulging in some favorite warm food with more calories that you'd care to count. This Chocolate Zucchini Bread is a perfect solution! You get the yumminess of the warm chocolaty carbs that is secretly packed with low calorie zucchini and apple sauce! There is so much flexibility in this recipe, you can make bread or muffins or both, you can make it chocolaty or plain, healthy or traditional.

What you will need:
2 1/2 cups Zucchini
3/4 cup Unsweetened Apple Sauce
1/3 cup Canola Oil
3 Eggs
2 tsp Vanilla Extract
1/2 cup Brown Sugar
1/3 cup Honey
3 cups Flour
1/2 cup Unsweetened Cocoa Powder
3 Tbs Ground Flax Seed
2 tsp  Cinnamon
1/4 tsp Nutmeg
1/4 tsp Allspice
1/4 tsp Ginger
1 tsp Salt
1 tsp Baking Soda
1/4 tsp Baking Powder
1/4 cup Raisins
1/4 cup Chopped Almonds

First lets get the zucchini grated so it is ready to go. Be sure to leave the skin on because it is full of nutrients such as potassium, folates, fiber, as well as vitamins A B and C. Use the large side of  a cheese grater to grate roughly 2 1/2 cups and set aside.
In a large bowl combine the apple sauce, canola oil, eggs, vanilla extract, brown sugar and honey and stir together with a spoon. Then stir in the grated zucchini.
In a separate bowl combine the flour, cocoa powder, ground flax seed (you can grind the flax seeds in a coffee grinder or use flax meal), cinnamon, nutmeg, allspice, ginger, salt, baking soda, and baking powder. Once these are combined you can slowly stir it in to the wet mixture. Then stir in the raisins and almonds (walnuts or pecans would be good too).
Set your oven to 350 and grease your bread pan and/or muffin tins. This will make roughly 2 bread loaves or 24 muffins. The muffins will need to bake for about 20 minutes and the loaves will need 50-60 minutes or until a toothpick comes  out clean. Let them cool for 10 minutes before placing on a cooling rack.
Enjoy this scrumptious and healthy treat!

Sunday, August 28, 2011

Oeufs en Cocotte

So I just finished reading Julie and Julia. One of the recipes that Julie really likes making from Julia Child's The Art of French Cooking is Oeufs en Cocotte (Eggs in Casserole). Although this is not a traditional version, it will not kill you as quickly as Julia Child's heavy butter cream and bacon versions.

The day before yesterday my mom asked me what to do with Swiss Chard. I realized I couldn't come up with anything better than salad greens, steam or saute. I knew I could do better than that.
This is a twist on an old French classic.

What you will need:
(This makes 2 servings for 10 oz ramekins)
9 small Tomatoes
1 cup Onion chopped
1 1/2 cup Swiss Chard chopped
2 cloves Garlic
Fresh Thyme
Fresh Oregano
Fresh Basil
1/2 cup Jalapeno Havarti Cheese chopped
1 Tbs Sour Cream
2 Eggs separated
Olive Oil
Balsamic
Salt
Pepper

I guess Daisy wants to help :)

To get started heat your oven to 350. Spread the tomatoes out on a cookie sheet that is lined with foil. Place them in the oven for 20 minutes or until they have shriveled. Once they are done you can set them aside to cool but leave the oven set to 350. You will use 4 tomatoes for each dish and be sure to have an extra for you to eat on it's own, they are so yummy!
While the tomatoes are baking, chop up 1 cup of onion and put it in a frying pan with about a tablespoon of olive oil and a splash of balsamic and turn to medium low heat. Let the onion cook down until translucent, about 7 minutes.
Wash the chard and dry with a cloth. Trim off the stems and then chop into roughly 1 inch pieces.You should have about 1 1/2 cups of tightly pressed chard. When the onions are cooked down add the chard and let it wilt for about 2 minutes stirring frequently.
Dice the 2 cloves of garlic and a small handful of fresh thyme, oregano and basil. Add these to the chard and onion for an additional minute. Then remove from heat and scoop it all into a bowl so it can cool.
Shred or chop 1/2 cup of cheese. I used Jalapeno Havarti because I had it on hand, but you can use what ever kind of cheese you like, I think Gruyere is the traditional cheese for this dish. Once the chard and onion is cooled, add the cheese to the mix.
Add 1 tablespoon of sour cream if you have it, but you could also use cream or half-and-half or omit all together.
Now we need to separate the eggs. Let the egg whites drop into the chard mix and carefully place the yolks in a small bowl making sure the yolks don't break. Mix the whites into the chard and add a bit of salt and pepper.
Place a little pat of butter in the bottom of each of the ramekins and put them in the oven until the  butter melts.
Put one tomato on the bottom of each dish, then divide the chard mix evenly between the dishes. Top with 3 tomatoes on each. Very carefully place a yolk on top of each dish and finish it off with a little more pepper. Put them in the oven for 10-20 depending on how you like your eggs.
When you take them out of the oven let them cool for a minute and then top it off  with fresh thyme and basil.
This would go nicely with some fresh baguette too!

I think this is traditionally a breakfast dish, but it would also make a nice light lunch or the main course of a dinner. Thank you Julia Child and Julie Powell for the inspiration, as cliche as that is. And thanks mom for provoking me to think outside the box with Swiss Chard. Does anyone have any creative ways to make Swiss Chard?
Bon Appetit!